• My Costumes
  • Personal Pages / Links
  • Upcoming Costumes
  • 2014 Convention + Cosplay Plans
  • Wig + Lenses Review

Mei Hoshi's Blog

Mei Hoshi's Blog

Tag Archives: tutorial

Character Profile: Yukina

02 Monday Jan 2023

Posted by Mei Hoshi in Character Profiles, Cosplay Updates, Make Up/Wig Test, Work in Progress

≈ Leave a comment

Tags

すなおの着物, すなおの着物チャンネル, cosplay, 舞台「幽☆遊☆白書」, 舞台幽遊白書, kimonosunao, konohana, sunaokimono, tutorial, yu yu hakusho, yukina, 幽☆遊☆白書, 幽遊白書, 木ノ花

Name: Yukina/ 雪菜
Appearance: Yu Yu Hakusho
Variation: Default
Description: Yukina is an Ice Maiden and twin sister of Hiei, although she is unaware of their relation. As a member of a demonic family of winter spirits, she produces beautiful jewels through her tears. When she found out about her brother who was cast from the Ice Kingdom she escaped to the Human World.

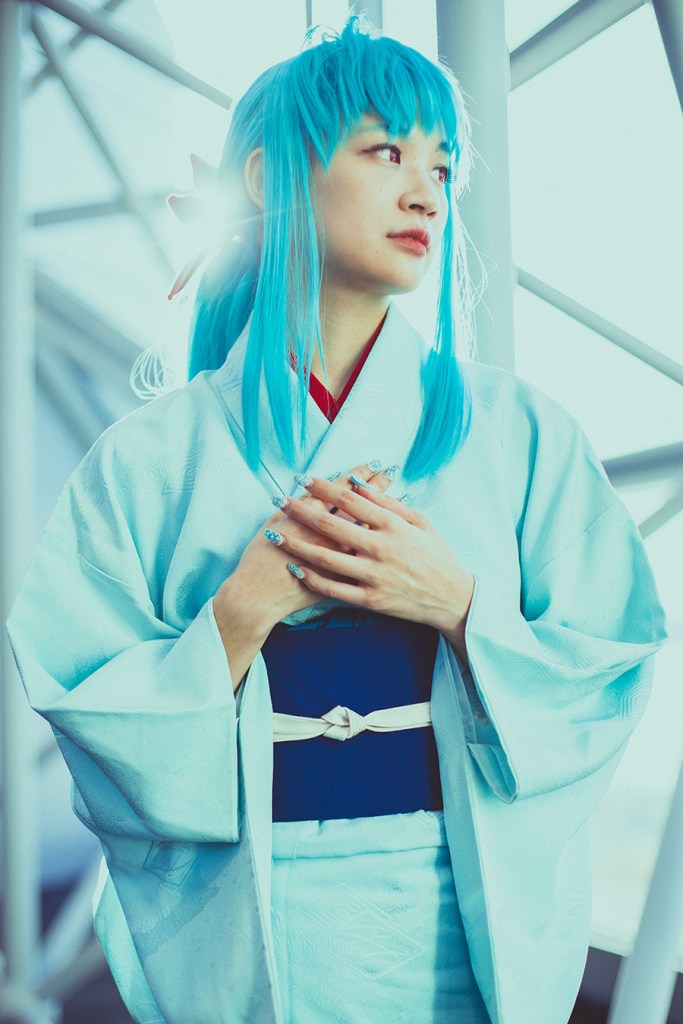
Worn at: AnimeNYC 2021.

Why I chose this costume:
Yu Yu Hakusho is one of my favorite animes. I recently reread it and had been watching the Stage Play and felt inspired to cosplay more characters. I actually had been working on the stage play version of Botan first, but Yukina was easier to bring to a convention. I also liked how her wig was translated into a more realistic hairstyle than the super poofy 90’s look, but that’s just a personal preference! Marina Tanoue is so cute as Yukina and everyone in the stage play is really well cast.

Marina Tanoue as Yukina.

Mechanics of the outfit:
Like the stage play, I wanted to keep the costume as authentic as possible and more on the realistic side since that was what I was basing it off. So a lot had to do with learning how to properly wear a kimono and tie an obi (practicing kitsuke, the art of dressing in kimono). I purchase the kimono, obiage, under kimono, tabi socks from Kimono Yukata Market Sakura. The obi, obijime, zori were purchase from Japan Yahoo! Auction. These were all auction bids so I can’t really link a specific shop, but for all the kimono accessories, I bought them from KIMONO WAKU. I did buy winter zori as well, (like the ones she wears when she’s first introduced) but didn’t have time to paint them.

You can get some great deals from bidding and sometimes pay much less for second hand items than purchasing them new. Sometimes the second hand items are new/unworn. The reason I didn’t purchase the kimono accessories via bidding was because there’s specific versions of items I wanted and there are a lot of items used when wearing kimono; it just didn’t feel worthwhile trying to outbid someone on something if I was still going to have to purchase x item elsewhere. If you’re not super picky or just a beginner learning, there a lot of great kitsuke kits you can get for cheaper than purchasing the items individually. I could go into specific in another post if anyone is interested, but it would take too long here lol.

The proxy I used was DEJAPAN. They are super easy to use for the most part, but I found it easiest to go to the actual website you want to search from instead of searching via their website (and just pasting in the specific listing into their website). It’s easier to click specific search criteria (price, category, new arrival/shortest bidding time, etc) via Yahoo! Auction. DEJAPAN’s website has less search criteria you can click and unless you search something specific, it will search everything and you can only look one page at a time. I prefer to open all the pages at once to search so it was easier to look on Yahoo! Auction. Again, I can write a guide if anyone is interested, it’s a lot to explain here.

Just to be clear, I’m not super fluent in Japanese and certainly not all the kanji, but the technology for Google Translate and to translate the website itself has come a long way! If I’m trying to look up a specific anime or word, I’ll just look it up on Wikipedia and change the language to Japanese. #hacks So if you know 0% Japanese, you can still be able to navigate it.

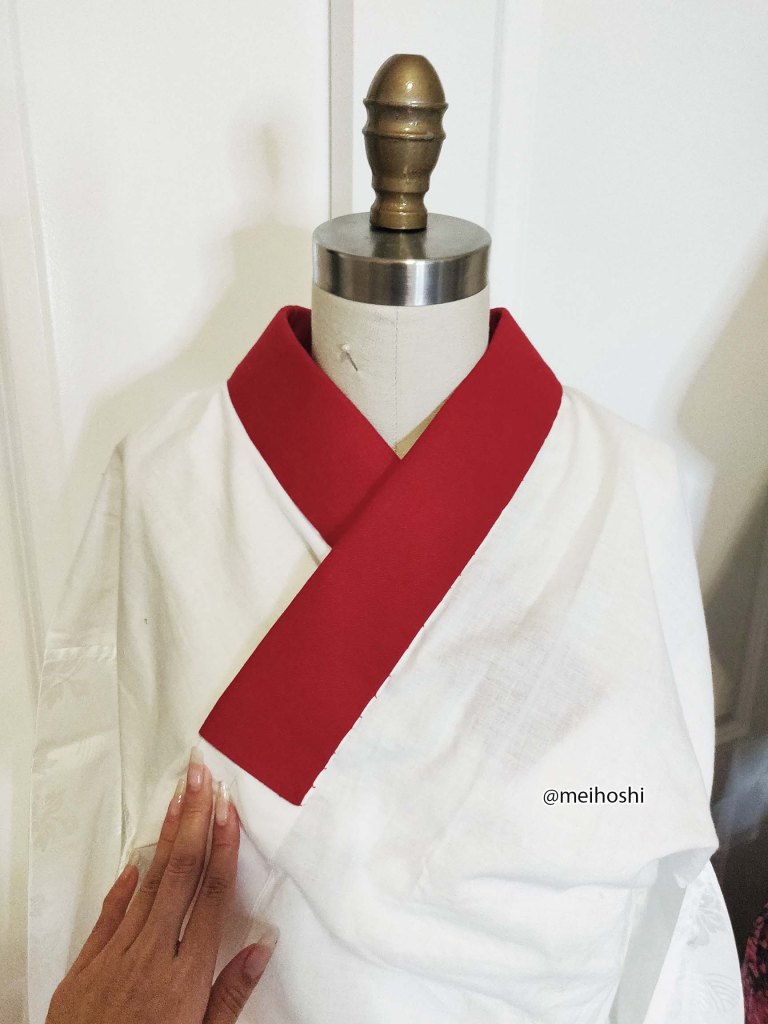
For the undergarment (nagajuban) I sewed the red collar from some fabric I had (that I also used on the hair piece). Although now I think I need another kimono underwear because I…. don’t want to take the collar off now LOL.

Fair warning, putting a kimono is not easy and I had to practice several times to get it correct. For most of it, I followed Kimono-Sunao‘s videos. Most of her videos don’t have English subtitles, but I think you can more or less figure it out from the video? Posting the videos I watched because it can be hard to search if you don’t know Japanese.

Also just wanted to clarify again if you’re buying a costume that’s tailored to fit you, you most likely will not need to do any of these. Kimonos, in general, are larger/longer than the average person, the purpose is that people of different sizes can wear it. So the way it’s tied is to fit the wearer.

Also, before anyone comes for me, I am not claiming to be super experiences or knowledgeable in kitsuke or kimonos. My knowledge comes from what other professionals are posting online.

How to Wear Kimono → She goes in-depth about how to wear the kimono, but may not be helpful if you don’t understand it.
How to Wear Furisode → Or if you’re impatient, you can watch the furisode version, it would just be without the long sleeves. The concept is basically the same.
How to tie Obijime → I used a flat obijime so this was especially helpful
How to tie Obiage → I loosely followed the beginning of this one, because the way she folds it is specific to the design on the obiage, but since mine was solid, it was less important to center the motif.
Troubleshooting undergarment collar → This is tricky LOL Sometimes by the time wear the kimono the undergarment will shift.
Items You’ll Need to Wear Kimono → I more or less used everything in this video, except I didn’t use the obi-makura 帯枕 (obi pillow) (the type of obi I did didn’t require one) and used some elastic versions of the koshi-himo 腰ひも (inner belt) instead of the ties like she shows. I also used a korin belt コーリンベルト for the collar as a personal preference.

Not from Kimono-Sunao, but I made a mistake of buying a Nagoya obi instead of Fukuro obi. Think I was tunnel visioning at this point and didn’t read the auction correctly. Most of them are tied in a taiko musubi (drum knot), the square looking knot, and I wanted a bow because that’s how it was tied in the stage play. But I ended up finding a video from 木ノ花 on YouTube that wasn’t too hard to tie. Though I had to redo it several times to get the tie proportion correct.

Odaiko Ribbon Obi Knot

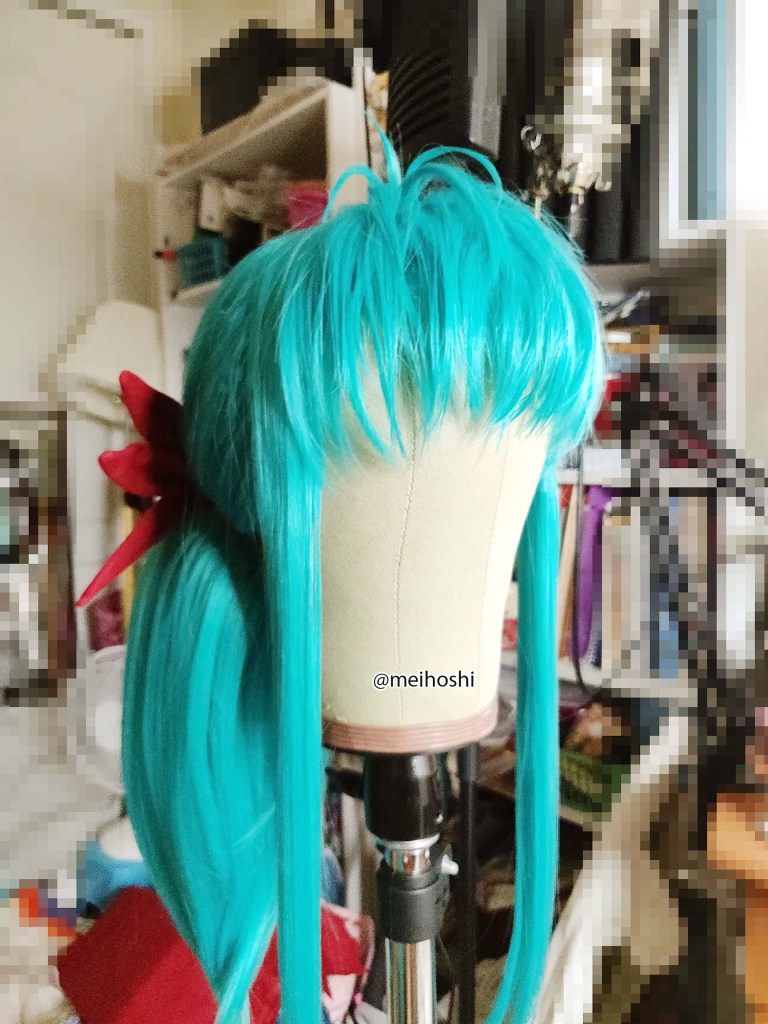
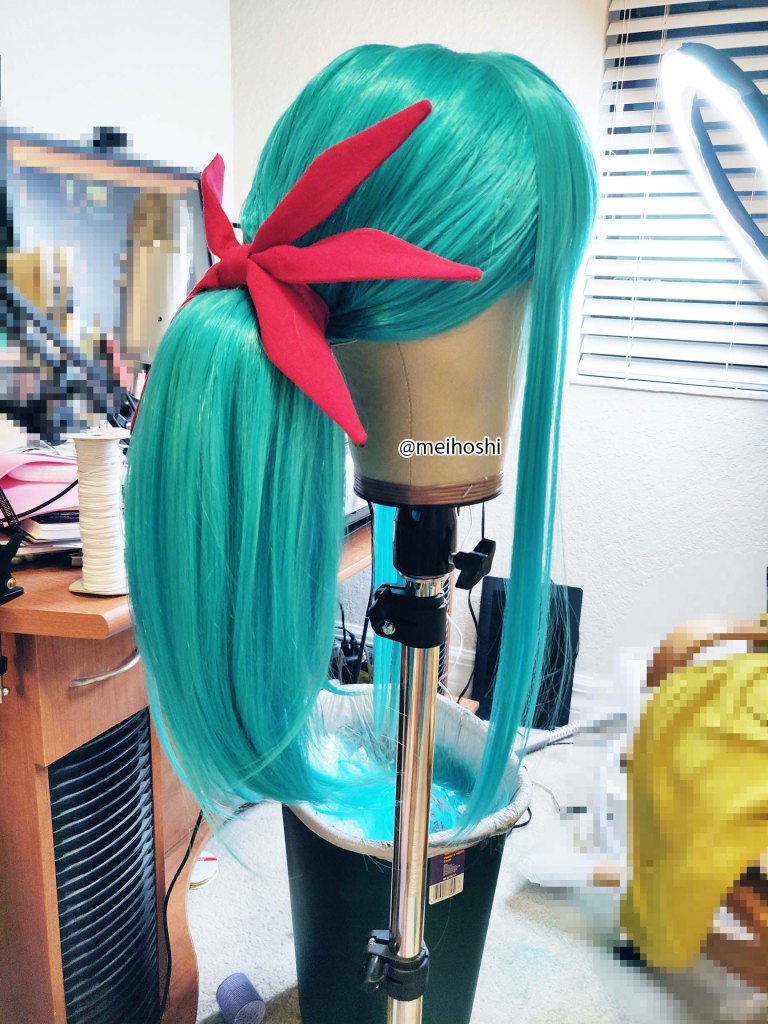
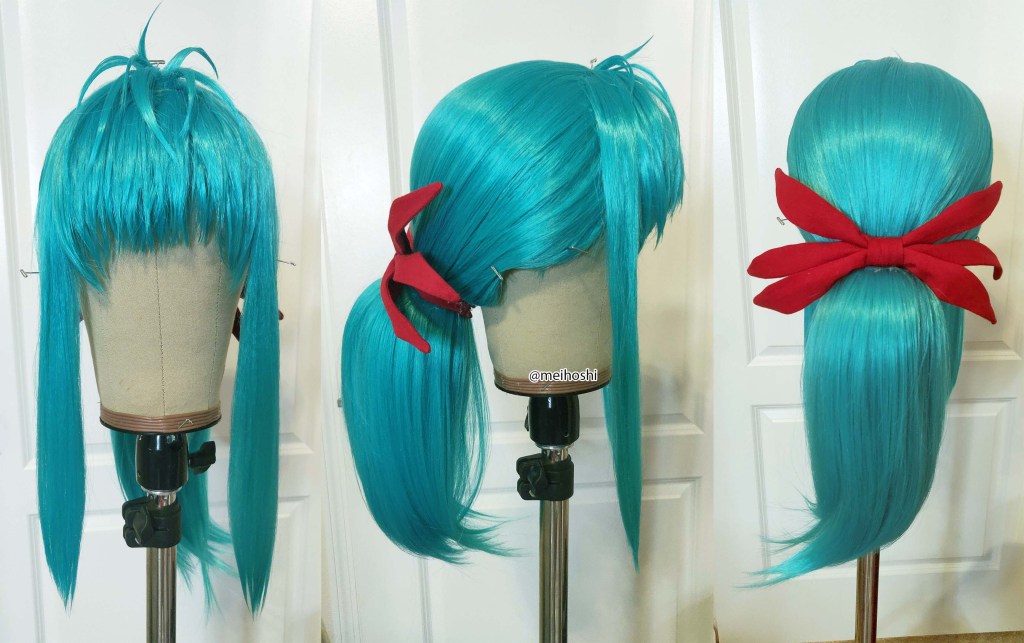
The wig I purchased off Amazon. I wanted to get one from Arda but they were on backorder at the time and I didn’t want to wait because I was also buying my Botan wig at the same time. I bought the wig from ROLECOS and was surprisingly impressed with the quality. It was very soft and quite thick; I had to even cut some of the volume out when I was doing the ponytail. Even though it said, “Prime,” it was being shipped out of China so it took a few weeks to receive. Maybe Amazon has some in stock now, but the one I purchased took a while. The wig is definitely teal like how they show it, but sometimes flares blue in photos.

I purchased a styrofoam ball for the back ponytail. I didn’t have time to go to the craft store and Walmart only sold it in this size (3.8″) so I shaved a bit off so it was smaller. In hindsight it probably didn’t really matter since it’s not big enough to be seen from the front. This was my first time stubbing a wig and it was terrifying LOL. But I learned a lot and feel a little more confident doing it again next time. I think if I can take the wig apart, I want to redo it. I bought a canvas wig head that was my size, but I made the mistake of not stretching and pinning it to the form while working on the wig, so it ended up being slightly smaller. I made the bangs a little too long so I was able to have the wig sit a bit further back so it wasn’t as noticeable.

I used some of the extra wefts from the ponytail to make into the ahoge and miscellaneous pieces sticking up and secured it with hot glue. I opted for separate pieces because the way the wig was constructed, the mesh/cap underneath could be seen if I tried to just spike it. I used Got 2b Glued hairspray for the ends. I saw a trick on how you can use a hair crimper iron to add volume and I think I will try it when I go back to fix the wig.

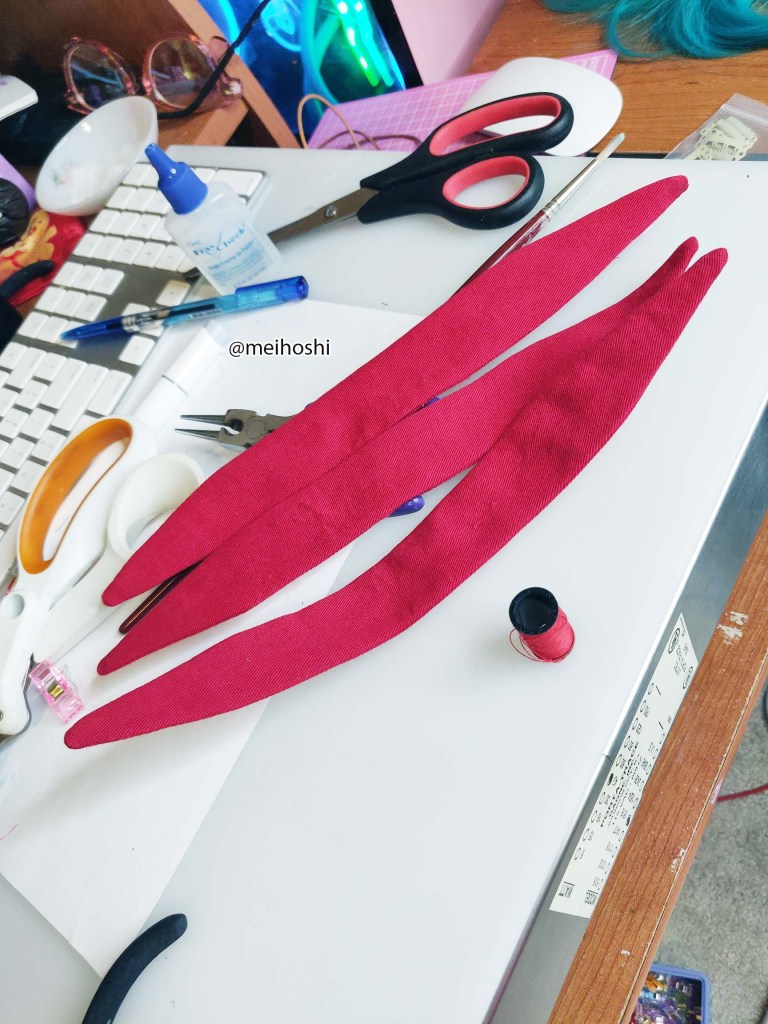
For her hair piece, I used some red fabric I had and made some rectangles that rounded into a point at the ends as shown. I added some wire on the inside to the width of the piece. This was so it could curl it to follow the direction of my head. The fabric I used was already on the stiffer side so I didn’t need to add any interfacing or make the wire into the shape of the hair piece. I had the wire on hand, but you want to use a gauge that’s high enough that it will hold it’s shape and not warp. I used a round-nose plier to make a circle at the two ends to secure it and so it couldn’t accidentally poke through the fabric. I didn’t sew the wire end to the fabric because if you make it the same size or even a pinch bigger, it should fit snugly.

Edit: Since writing this post, I ended up going back and redoing her wig, which I highly never recommend. Taking apart the wig after I had hot glued it together was tedious. Fortunately the wig was heat resistant, so I was able to just straighten the ends that looked wonky. It ended up looking way better and should hopefully fit better. Unfortunately you can see some of the glue parts from the previous version, but it’s whatever. I used clear caulk this time with minimal hot glue. I cut the bangs shorter and restyled them. Kids, never take a somewhat styled wig and just toss it in a wig bag LOL. I tried the crimping method on the side pieces and I’m not sure I like them. I think the wig fibers are too silky/soft so it was hard to tease without just combing it all out. Last wig pic is the new one!

Personal Feelings:
Wow, even though the costume was bought pieces, I learned so much about kitsuke and kimonos in general and it was challenge, but so much fun. I had always wanted to own some kimono/furisode growing up but they were always super expensive or I just had other priorities. It was really exciting being able to do it, even in cosplay form. Wig styling has always been challenging for me so I usually just avoid it LOL. But I’m glad I pushed myself to step outside of my comfort zone, even though the wig seems “simple.” It kind of made me realize Yukina is a pretty minor character for the most part. But working on the cosplay and finding all the perfect pieces for her really made me love her more.

Last photo by simplyfrankpro.

Character Profile: Makoto Tachibana

28 Saturday Jun 2014

Posted by Mei Hoshi in Character Profiles

≈ Leave a comment

Tags

cosplay, free, iwatobi swim club, Makoto, Makoto Tachibana, splash free, tutorial

Name: Makoto Tachibana/ 橘 真琴1604833_579931772097045_1698504873_n
Appearance: Free! – Iwatobi Swim Club
Variation: Splash Free (Ending Theme Song)
Description: Makoto is Haruka’s best friend, and is also a second-year in the same class as Haruka. Unlike Haruka, he is more outgoing and often speaks up for Haruka. He is nice and considerate to others. However, he is weak-hearted and gets scared easily. He developed a fear of the ocean due to a traumatic incident in which an old fisherman, whom Makoto greatly idolized, drowned in a typhoon alongside many others. He is captain of the swim club. His swimming style is backstroke.

Worn at: Colossalcon 2014.

Why I chose this costume:
One of my friends wanted to do a genderbent group Free, in the outfits they wear in the ending theme song. I really wanted to do Makoto because he’s like the big brother in the group and really kind and gentle.

Mechanics of the outfit:
My Haru and I wanted to do a belly dance inspired type of outfit. I really love Indian culture and Indian films, so I wanted to keep something to the idea of that too without straying too far from the original design. The turban/head wrap I did similar to a Square Scarf Turban Tie. It was a long pieces of yellow cotton sateen that I surged the edges on. The top I did similar to a lehenga top. I did blue because in the PV you can see that Makoto does a blue shirt under his green one.

The green shirt is reflected in the hip scarf. The pants are just an off-white chiffon baggy pants with a slit on the side seam. The sash/dupatta was probably the most time consuming part. It’s lined in the underside of red satin. All the fabrics were kundan-choker-worn-by-celebrity-madhuri-dixit-in-devdas-for-the-song-‘kahe-ched-ched-mohe’-btownmasti.com_satin, the striped individually sewn on, and the triangles were painted on. Since there looked like there were lines between the black and white, I satin stitched on those lines.

The jewelry was probably my favorite part. I used Madhuri Dixit as Chandramukhi in Devdas. Although she plays a courtesan in the film, she was also a dancer. I also didn’t want to go too flashy on the jewelry because in the PV, Haru is basically searching for water and no one has any except Rin, so it hints that they weren’t living so lavishly. The jewelry was bought on ebay. I bought bangles, a necklace, earrings, and a slave bracelet. I really wanted to get a tikka too, but I was afraid it’d be too much with the turban. Plus the wig I used had bangs anyways. I really love Indian jewelry so this was a nice excuse to get a little crazy with it. The shoes my friend had gotten for me when she visited India back in high school. The wig was borrowed from Chinasaur.

Personal Feelings:
Even though the outfit didn’t take too long to make, I still had a lot of fun wearing him. I don’t think I’ve really had that feeling for a long time since I feel like I always have a lot of plans for cons or just end up stressing out over stuff. Definitely want to wear him again more~

Photography by M1Photo

Photography by M1Photo


eBay Wig Review: rixinyueyi9898

07 Monday Mar 2011

Posted by Mei Hoshi in Cosplay Reviews

≈ 1 Comment

Tags

cosplay, final fantasy x, review, rixinyueyi9898, tutorial, wig, yuna

As you know, or don’t know, I’ll be cosplaying Final Fantasy X Yuna (summoner) this year! I planned on debuting her earlier at SpringFest this Saturday, so last week I ordered her wig.

The wig came out a lot curlier than the image (which isn’t an issue). The fibers were really soft. The wig is a bit darker than I had anticipated and wanted for Yuna, but in the light it looks lighter.

The only possible issue I could have with it, is that on the website, it says the fibers were Kanekalon, but then on the tag the wig came with, it says it was synthetic fibers. Not that it mattered either way for me because the fibers were super soft. I’m not sure if it was because it wasn’t as thick as my other wigs, but it hardly tangled. There was virtually no tangle with this wig.

What I liked about this wig, and the reason I chose it is that the color looks very natural that it has highlights and such. Nothing too noticeable, but you can tell it’s not just one straight color.

Rating: ★★★★☆/ 4.5 out of 5.

Pro:
– Great quality.
– Quick shipping.
– Came with a free wig cap.
– Soft fibers.

Con:
– No tracking number.
– Not heat resistant.
– Fibers were teased under the bangs so it got itchy after wearing for a while.

Price: 24.30$ + free shipping. (It was 10% off.)
Item Location: China.
Time for Arrival: 10 days.

Would I order from them again? Yes.

If you wish to purchase this wig, search “1813 New long Light Brown Fashion Wavy Wig” in the eBay search bar or look through rixinyueyi9898’s ebay profile.

Character Profile: Pichu [Gijinka]

30 Thursday Sep 2010

Posted by Mei Hoshi in Character Profiles

≈ Leave a comment

Tags

animenext, cosplay, gijinka, knightmare6, pichu, pokemon, tutorial

Name: Pichu / ピチュー
Appearance: Pokemon Generation II
Variation: Gijinka
Height: 1’00”
Type: Electric
Description: Known as the “Tiny Mouse” species of Pokémon, are the pre-evolved version of Pikachu. Pichu is a small ground-dwelling rodent. Its fur is very short, and it has bright yellow coloration. The tips of its large ears are black, and it has additional black markings on its neck and short tail.

Worn at: AnimeNEXT 2010

Why I chose this costume:
There’s an interesting story for this. My roommate is one of the reasons I got into cosplaying. I’ve always wanted to cosplay, but didn’t have the skill or money for it. Then I learned that she cosplayed as well, so that pretty much started me off in cosplaying. She mentioned she was doing a Plusle and Minun gijinka with her best friend, so I was looking up Pokemon gijinkas to do. I thought, why not do a whole Pikachu family cosplay? I decided I was going to do Pichu and my friends volunteered cosplaying as Pikachu and Raichu. Thus, the Pikachu family is born!

Mechanics of the outfit:
My mom made the base dress and the petticoat underneath. I made the ears, and sewed on the collar. For the tail, I followed the reference picture and made sewed a ribbon in the back. For the shoes, I just wore a pair of yellow Harajuku Lovers converses that I had. I decided not to purchase a wig and just keep my natural hair. I originally had no intention of purchasing another wig because it would’ve been too expensive at the time.

The ears were the hardest part. I was feeling uninspired and short on time. I made ear covers with the fabric used for the dress, which was a terrible idea because it was a knit fabric so it was stretchy. I was originally going to put foam board inside the covers, and attach them to a headband, which completely failed. Then I used bubble wrap so it would be lighter, which sort of worked, but would have still failed. Suddenly I had an epiphany the night before I had to debut it. I put my hair in pigtails and pinned the ears to it. It completely worked. It flopped from now and then, but it still worked.

Personal Thoughts/Feelings:
Ahh.. This was a fun cosplay. I don’t think I’ll do another Pokemon gijinka for a while though, haha. Unless I needed a cosplay and absolutely had nothing else to do. I guess because a gijinka isn’t an actual official outfit. You could throw parts and bits together to make a gijinka, which makes it different and unique, but it’s not official. There’s nothing to base it upon. For more images, check out my Facebook!

This slideshow requires JavaScript.

Copyright (c) 2010 Knightmare6 (Philip Ng). All rights reserved.
Disclaimer: The entire outfit is not made by myself.

Character Profile: Tifa Lockhart

30 Thursday Sep 2010

Posted by Mei Hoshi in Character Profiles

≈ Leave a comment

Tags

advent children, animenext, cosplay, final fantasy 7, tifa lockhart, tutorial

Name: Tifa Lockhart / ティファ・ロックハート
Appearance: Final Fantasy VII
Variation: Advent Children
Age: 22
Height: 5’4″
Blood Type: B
Description: Tifa Lockhart is a female protagonist in Final Fantasy VII. She is Cloud’s childhood friend from Nibelheim and a member of AVALANCHE. Her personality is much more laid back and selfless in comparison, with a motherly streak concerning all her friends and her attitude to others. Tifa is quick to hide her true feelings her being shyness a key aspect of her character, and she is caring and loving to a fault.

Bright and optimistic, Tifa always cheers up the others when they’re down. But don’t let her looks fool you, she can decimate almost any enemy with her fists…

Worn at: AnimeNEXT 2010,  New York Comic Con/Anime Festival 2010.

Why I chose this costume:
Ironically, she wasn’t my first choice. I wanted a third costume for AnimeNEXT and I was originally going to cosplay as Yuffie Kisaragi in her Advent Children outfit. I think I was partially discouraged from being Tifa. Then I decided I didn’t want to cosplay as Yuffie, and wanted to cosplay as Rikku from Final Fantasy X-2. First her thief outfit, got shot down from that, then her songstress outfit, which was likewise shot down. Somehow I wound up back to Tifa and decided to just cosplay her.

Mechanics of the outfit:
I cannot even begin to describe what a pain in the butt it was to make this costume.. It wasn’t the design that was the issue. It was the fabric. I didn’t buy pleather, I want to say it’s vinyl pleather, but I’m not totally sure. It was basically a knit (stretchy) fabric with a film of the shiny stuff on it. I had to experience this first hand when the film on the back of the pants started to melt(?) off. I think it was because it was hot and I was sitting outside during the convention. But the cape in the back covers it so it’s not too big of a deal.

The only parts I made are the pants. The rest my mom made because I ran short on time (and I don’t know how to sew a vest yet..). I cut up the shirt and the shoes, gloves, and ribbon I already had.

Personal Feelings:
I have to admit, prior to cosplaying her, I never played the game. In fact, I still have yet to finish it! But I watched “Advent Children” and just been reading online, and the more I read the more I fell in love with her character and her personality. Her personality is somewhat similar to mine, and I love that she isn’t like the generic female character, she’s strong, a heroine even. For more images, check out my deviantArt!

This slideshow requires JavaScript.

© 2010 TheBigTog. Any use of this photograph for ANY reason without the expressed written consent of the author is prohibited.

Summoner Yuna: Tutorial / Work in Progress

10 Tuesday Aug 2010

Posted by Mei Hoshi in Tutorial, Work in Progress

≈ Leave a comment

Tags

cosplay, final fantasy x, summoner, tutorial, work in progress, yuna

I’m currently working on my Yuna cosplay, her FFX Summoner version. I wanted to do a partial tutorial/how I approached it. I just followed the game art version, not the FMV or CG version. There are slight differences in all of them, ex. in the game art version she has a light blue bead on the decoration dangling off the hibiscus flower while the CG version does not.

The version I’m using as my inspiration is the image on the right.

I’m going to write them in a series of posts, only because I am still currently working on it. I used very few patterns for this, but looked at some tutorials for ideas.

Credits: There are a lot of wonderful tutorials for Yuna that you can find all over the internet if you look. One of the places is on Cosplay.com That link shows you a lot of reference pictures for Yuna. Even the little details like her bracelets and rings and such. It also has great images for her obi and skirt design.

Another is a tutorial made by Teeny of TotallyToast. She includes a lot of design pictures on her approach of Yuna’s costume. She made her based on accuracy (which is great for a perfectionist such as myself xD) and her cosplay is really remarkable.

Tutorials

  • Sleeve Gradient Dying

Summoner Yuna Tutorial/WIP: Sleeves Gradient Dyeing

10 Tuesday Aug 2010

Posted by Mei Hoshi in Tutorial

≈ 1 Comment

Tags

cosplay, final fantasy, final fantasy x, gradient dye, rit dye, sleeves, tutorial, yuna

I followed Teeny’s sleeves diagram seen on the right. This method is great especially when you’re making the sleeves out of material like cotton, because then it’s not too see through.

I originally cut mine on the length grain but messed up and ended up cutting it on the cross grain, but in the end it didn’t make too much of a difference anyways. (For more information about fabric grain, check out this link!)

For the gradient look, I used RIT dye (powder) in Petal Pink. (I’ll explain the dying process in a bit.) I realize that the sleeves are actually cream with the gradient dye, but I used white cotton. I dyed it before I put the sleeves together.

There’s two reasons I do that, one is I cut more than I needed to to begin with. The reason for that is just in case you mess up or something, you can always chop it off. If you cut it exactly and you mess it up, you’re stuck with it. The other reason is that I had originally sewn up another pair of sleeves (which I ended up disliking, the fabric was just wrong) and I’m not sure what kind of fabric is was but it wrinkled so easily and barely accepted the dye. That and I messed up when I cut it and didn’t like the way I had ended up making it.

How long should you cut the fabric? Remember when you fold the fabric on the horizontal fold like the image, and place it on your arm (like you’re wearing it) that’s how long the fabric will be measured. How long you make it is up to you. For mine, if I stretched my arm out horizontally, it hit about mid thigh, and if I placed my arm on my waist right under the bust, it was just above the knee.

Gradient Dying Tutorial

  • This is a basic gradient dying tutorial, so you can use this for other colors if you want. This is just the method I used. This is the first time I did a gradient dye on fabric and it came out nice. If you have any suggestions to make this tutorial better, let me know!

Pre-treat your fabric! I personally didn’t, because I just cut white fabric, but you should get your fabric as white as you can (you can use dye remover like the box suggests if you really want).

  1. I folded the fabric like in the design. I dyed my fabric outside on the deck because I hear all these staining stories xD
  2. I boiled a pot of water and poured it in the bucket I was going to dye my fabric in. If you don’t want to ruin the bucket, just place a large plastic bag on the inside like I did. Just make sure the plastic bag doesn’t have holes in it or it’ll defeat the purpose of using it! The water doesn’t have to to be bubbling boiling, just so it’s hot!
  3. You’re going to use the fabric dye in rounds, not all at once. Take a water bottle you don’t want and fill it up with the hot water. Use with caution! I shouldn’t have to say this, but the bottle will be hot. Pour a little bit of the dye powder in the water bottle. I want to say less than 1/3rd of the packet.
  4. The pour a little bit of the dyed water into the bucket. You don’t want it too red, but not so little that it just looks barely tinted. Then I used a dowel rod that I had lying around the house to mix the water.
  5. Before you dye the fabric, completely dip the fabric in warm/hot water before you dye it. You don’t have to dye it in boiling water and I wouldn’t recommend it, unless you want to burn your fingers. Don’t worry, the dye won’t run up the fabric from doing this.
  6. Remember you’re starting from lightest to dark. The gradient begins after where the sleeves would be, so I’d say start about 1 ft or so after the fold. Dip the fabric into the water. You don’t want a line to appear so dip it in and out around where you’re starting. You don’t need to take the whole fabric out of the water each time, just so there isn’t a line.
  7. Continue doing this until you get to the end. Don’t forget to add more dye each time. If you run out from the water bottle, simply add more hot water and dye, shake and pour some into the bucket. Then dip the fabric. I used the dowel rod to mix the fabric into the water.
  8. For each layers, I switched between fabrics. I would dye one layer on the sleeve, then dye the other fabric. I wouldn’t recommend dyeing both at the same time. I discovered that since I folded it and dyed it, the inside of the fabric was slightly lighter than the outside (which isn’t too big of a deal since you can’t see the inside anyways).
  9. Leave the fabric out to completely dry.

Post-treat your fabric! All I did was rinse out my fabric in a bucket of cold/warm water. I basically dunked it in and out of the water, and swirled it around a few times, then poured out the water and repeated the process. Rinse it until the water is close to clear. I wouldn’t recommend throwing it in the washing machine if you haven’t sewn it yet because it will most likely fray like crazy! Also, it’s not a lot of fabric to begin with so it’d just end up being a waste of water.

Notes

  •   Wear gloves! I didn’t, because I didn’t really put my hands in the water, but you never know!
  • Wear clothes you don’t care about. Even if you’re very careful, you never know if the water could splash up and hit you. Especially if you’re using darker colors.
  • Post-treat your fabric!
  • Keep in mind that the color will become slightly lighter after you post treat your fabric. With that in mind, when you dye, dye it a tint darker. You don’t need to over exaggerate it. If you want it to be a slight pink, you don’t need to dye it pink-reddish. It won’t fade THAT much.
  • DO NOT directly pour the dye into the bucket of water, pour it in the water bottle first. THIS IS VERY IMPORTANT! Not only will you be more accurate when it comes to the amount of color you pour, sometimes if the powder doesn’t dissolve in the water, you’ll find random spots of color where the powder ends up clinging to the fabric.
  • I did NOT use a lot of water dyeing this. I probably used less than 2 pots of water, and ended up using less than 1/2 the packet.
  • Dyeing is pretty much based by sight, so I can’t give you an exact measurement of powder to use or how long to leave it in.

Check out the next post for how to sew it together!

Enter your email address to follow this blog by email.

Join 3,413 other subscribers

‘Like’ Me on Facebook!

‘Like’ Me on Facebook!

Categories

  • Character Profiles (6)
  • Convention Reports (10)
  • Cosplay Reviews (18)
  • Cosplay Updates (5)
  • Life/Personal (1)
  • Make Up/Wig Test (3)
  • Tutorial (2)
  • Uncategorized (5)
  • Work in Progress (4)

Archives

  • January 2023 (1)
  • February 2017 (1)
  • June 2014 (1)
  • September 2013 (1)
  • March 2013 (1)
  • November 2012 (1)
  • December 2011 (5)
  • November 2011 (2)
  • September 2011 (5)
  • August 2011 (1)
  • July 2011 (1)
  • May 2011 (2)
  • April 2011 (3)
  • March 2011 (1)
  • January 2011 (1)
  • November 2010 (1)
  • October 2010 (1)
  • September 2010 (6)
  • August 2010 (5)
  • July 2010 (2)
  • June 2010 (3)
  • May 2010 (1)
  • April 2010 (1)
  • February 2010 (1)

Blog at WordPress.com.

Privacy & Cookies: This site uses cookies. By continuing to use this website, you agree to their use.
To find out more, including how to control cookies, see here: Cookie Policy
  • Subscribe Subscribed
    • Mei Hoshi's Blog
    • Already have a WordPress.com account? Log in now.
    • Mei Hoshi's Blog
    • Subscribe Subscribed
    • Sign up
    • Log in
    • Report this content
    • View site in Reader
    • Manage subscriptions
    • Collapse this bar
 

Loading Comments...